This post may contain affiliate links, please read our disclosure policy for details.
I have to admit sourdough baking used to intimidate me. When it first became popular back in 2020, I looked into it but quickly gave up. The idea of feeding flour every single day felt overwhelming, and the process seemed to take forever. But this year, I told myself: I want to learn how to make bread. and not just any bread — I want to learn how to make sourdough bread.
How It All Started
Last March, I was at a work dinner with my husband when one of the girls mentioned she’d started baking sourdough and was now completely hooked. She even shared her recipe — almost four pages long! I smiled, said thank you, and saved it for “later.” Spoiler alert: I didn’t touch it for months.
Fast-forward to October — after watching what felt like a hundred YouTube videos on sourdough — I finally decided it was time to make sourdough. To ease myself into bread making, I started with a super easy artisan bread recipe. When that loaf came out golden, crusty, and perfect, I thought, This isn’t so hard… I can totally do this!
Making the Sourdough Starter
Next came the essential part: the starter. I knew I needed one to make true sourdough, so I started researching how to make it from scratch. That’s when I came across a tip that changed everything — start with a dehydrated, stabilized starter if you’re new to sourdough (especially during colder months).
Since it was already fall and my kitchen tends to be on the cooler side, I decided to give that method a try. I ordered a dehydrated starter from Captain Sour Pants and followed their instructions carefully.
After five days… not much was happening. A few bubbles here and there, but no real rise after feeding. That’s when I realized temperature plays a huge role in fermentation.
I decided to invest in a warming plate to keep my starter at a stable temperature between 75–80°F (21–27°C). Within a few days, I started to see real activity — bubbles, rise, and that distinct tangy smell.


That’s when I knew she was alive! I officially named her Carmela, my little sourdough starter. And let me tell you, once Carmela came to life, there was no going back.
Beginner Tips I’ve Learned So Far
If you’re thinking about starting your own sourdough baking process, here are a few things I’ve learned:
- Don’t rush it. Sourdough takes time — it’s not difficult, but it’s all about patience.
- Temperature matters. Keep your starter warm and consistent. A warming plate or even a turned-off oven with the light on helps.
- Feed regularly but simply. Equal parts flour and water by weight. That’s it. My ratio is 50g starter, 50g all purpose flour, 50g warm water.
- Watch for activity, not just time. Bubbles, a dome shape, and a pleasant sour smell mean it’s happy.
- Name your starter! It sounds silly, but it makes the process more fun and personal.
My First Sourdough Loaf: What I Learned (and What I’d Do Differently)
After days of feeding and waiting, my sourdough starter Carmela was finally alive and bubbly. It was time to take the next big step: baking my first real sourdough loaf. I won’t lie, I was nervous. I had watched so many YouTube tutorials that I could practically recite the process, but doing it myself felt like a whole new challenge.
Choosing the Recipe
Since I was still new, I didn’t want to overcomplicate things. I chose a beginner-friendly sourdough recipe that only used flour, water, salt, and starter — no fancy add-ins or special techniques. I used the Preppy Kitchen Sourdough Recipe, it always works. I wanted to understand the process before playing with variations. I followed the recipe as closely as possible, using a kitchen scale (which I highly recommend for accuracy).
Mixing and Autolyse
I started by mixing the flour and water, then let it rest — a step called the autolyse. This helps the gluten develop naturally before adding the salt and starter.
When I added Carmela (my active starter) and salt, I began the stretch-and-fold process about 4 times every 20 minutes. This part was surprisingly therapeutic! The dough slowly transformed from sticky to elastic, and I could feel it coming together.
The Long Fermentation
After several stretch-and-fold rounds, I covered my dough and left it for the bulk fermentation. This step took most of the day, and I learned that temperature really matters here, too. My kitchen was around 70°F, so it took about 8 hours before the dough had doubled in size.
Once it looked airy and bubbly, I shaped it gently, placed it in a floured banneton (proofing basket), and put it in the fridge overnight for a cold retard — which helps develop flavor and makes scoring easier.
Baking Day
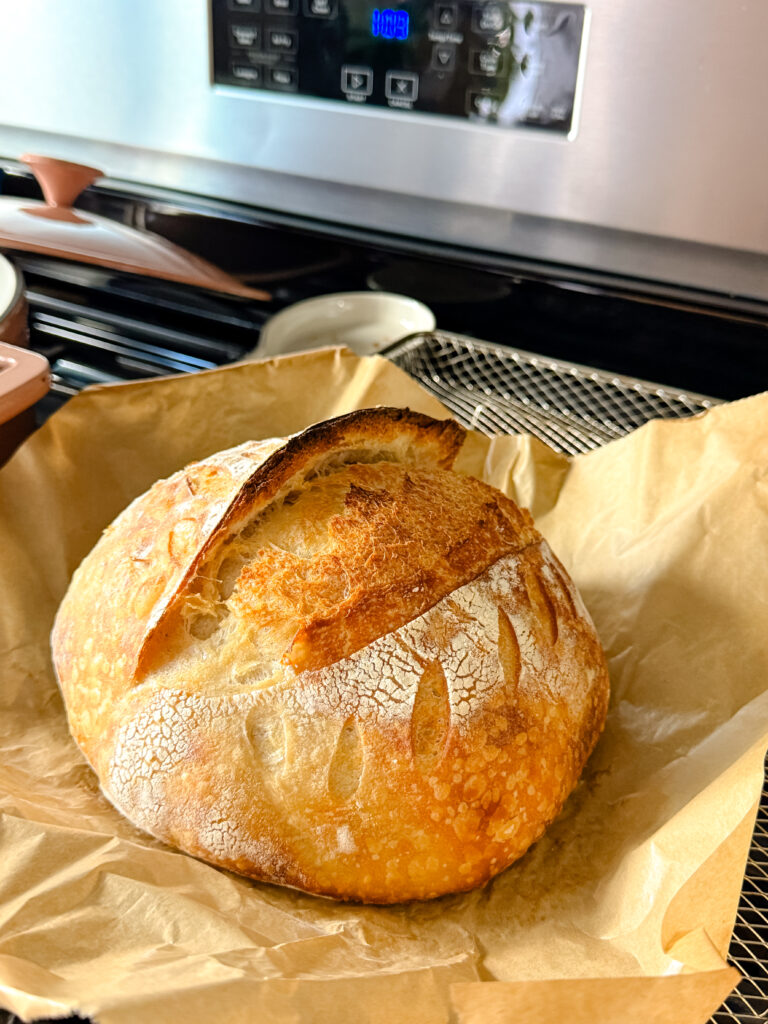
The next morning was the moment of truth. I preheated my Dutch oven at 500°F for 35 minutes, placed my dough on parchment paper, scored it with a razor blade, and gently placed it inside. When I lifted the lid 25 minutes later, I actually gasped — it had risen beautifully! Golden brown, crackly crust, and that unmistakable sourdough aroma filled my kitchen.
Was it perfect? Not quite. My scoring could have been deeper, and the bottom was a bit too dark. But the crumb was open, soft, and slightly tangy .
What I Learned from My First Loaf
- Timing is everything. Watch your dough, not the clock. Every kitchen and starter behaves differently.
- Temperature control helps. Warm environments speed up fermentation; cool ones slow it down.
- Flour choice matters. Bread flour gives a better rise and structure than all-purpose flour. I love the King Arthur bread flour.
- Don’t skip the overnight fridge rest. It adds depth of flavor and makes handling easier.
- Practice makes better. Each bake teaches you something new.
When I sliced into that first loaf and heard the crust crackle, it felt so rewarding. After being intimidated for years, I finally made my own sourdough bread — from scratch, with my own hands.
And that’s what I love about baking: it’s humbling, a little unpredictable, and so worth the effort.